WC3Connect
From ENT Wiki
Contents
WC3Connect
Standalone app used to connect your Warcraft III client to multiple communities.
Advantages
- Join Games Easier: All that is required is for you to create an account, and select a game listed within the WC3Connect client. After, launch your Warcraft III game and navigate to the LAN menu to join your desired lobby.
- Reduces chance of disconnection: WC3Connect gives you GProxy++ support, meaning that you can reconnect to games if your Internet connection briefly disconnects.
Setup
WC3 Connect Links
| WC3Connect Client Download Links | ||
|---|---|---|
| Windows | https://entgaming.net/wc3connect.exe | |
| Macintosh | https://entgaming.net/wc3connect-osx.zip | |
| Linux | https://entgaming.net/wc3connect-amd64 | |
| Cross-platform Version - Requires Java | ||
| Download | https://entgaming.net/wc3connect.jar | |
| Java | https://www.java.com/en/download/ | |
Prerequisites
| WC3 Expansion: | Warcraft III:The Frozen Throne |
| Patch Version: | 1.30.1.10211 |
How-To Guides
Account Creation
| NOTE: If you had an ENT Gaming forum account prior to Oct.14 2018, then use your forum login credentials to log in. |
- Insert your desired username
- Insert your desired password
- Click Sign Up
- If the account is available, you'll be prompted that the account creation was successful (See Figure 2)
- If the account is unavailable, you'll be prompted that the username is unavailable (See Figure 3)
Below is an overview of the signup process:
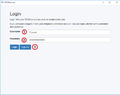
Figure 1

Figure 2
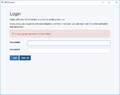
Figure 3


Joining A Game
- Open WC3Connect
- Login using your existing username and password
- If you do not have an account, follow the Account Creation steps listed above.
- Select your desired game from the available games listed. (See Figure 1)
- Games are seperated into 3 tabs
- Public - Player hosted games from ENT and MMH
- ENT Autohost - Autohosted games from ENT Gaming
- Others - Autohosted games from other communities
- Games are seperated into 3 tabs
- Open Warcraft III
- Select Local Area Network (See Figure 2)
- Select your desired game from the games list (See Figure 3)
- Dependent on the number of local network adapters with IPs, it will display the same lobby multiple times when you've selected a lobby in the WC3Connect client.
- If joined successfully, you should be in a game lobby (See Figure 4)
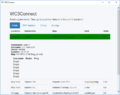
Figure 1
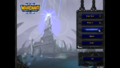
Figure 2
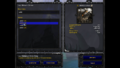
Figure 3

Figure 4


Validate Your WC3Connect Account On the ENT Gaming Forum
ENT Gaming Forum
- Login to the ENT Gaming Forum
- Navigate to the Validate portion of ENT Link
- Complete the following: (See Figure 1)
- Fill in username
- Select WC3Connect
- Click Validate
- This will provide you with a code to insert into your WC3Connect client (See Figure 2)
WC3Connect Client
- Open the WC3Connect client
- Login with the account you wish to validate
- Open the Validate setting: (See Figure 3)
- Click Settings > Validate
- Enter the code provided on the forum and click Validate Account (See Figure 4)
- If Validate request is sent successfully, it will display a specific message (See Figure 5)
- You can verify your account has been validated via Linked Accounts in ENT Link

Figure 1

Figure 2
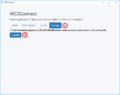
Figure 3
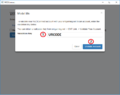
Figure 4
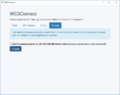
Figure 5


