EntGaming:LTDGuides
Contents
Legion TD Guides
The following guides have been composed by CreativeLP. For feedback, please post here. Please note, LTD has many different strategies and ways to play the game. This guide is not the "only way" to play.
Basics
Game Stages
The game can be divided into 3 parts, the Early, Mid and Lategame.
- Early Game describes level 1-10. This is the stage of the game where you determine if you're going to play yolo or holder. Here you try to get as much income as possible to get a foundation for later stages, but don't miss out on all the value, income alone might not save you. It's also important to save team heals and blow enemy heals. For this stage of the game, all sorts of yolo units are good, aswell as strong holders for 7 like Yggdrasil or Harlot or Level 10 Holders like Hades, Wolverine, Infantry or Elite Archer. Key Levels to blow heals are 5,7,8,10.
- Mid Game describes level 11-20. This is the stage where you try to kill the enemy by doing longer savings. Most games end in this stage. Your main task is to build vs key levels to survive or win the race. Having more heals than the enemy can be very helpful here Key Levels to end the game are 14,15,17,20. Good Units to hold those Levels are: Blaster and Archers for 14, Hydra/Druids/Revenants for 15 and Mutants, Greymane, Goliath and Neotank for 17, Hydra and Druid are also good on Level 20, as well as Hades.
- Late Game describes level 21-31. Approximately 10% of the games get to this level. If both teams survived Mid Game the game will try to find a winner in this stage. People push hard here, 7/9 - 7/15 is usual. Rest is just about getting as much value as possible. Flying Units get more important as they do not collision with the ground units, also try to get as many Auras as possible.
Key Levels to end the game are 24,27,28,31. Good Units for those Levels are, Tree Of Knowledge, Dragon Aspect, Death Dragon for both 24 and 27, Neotanks or Doomsday for 24,28 and 31 and all sorts of strong damage dealers for 31 like Meridian or Gryphon Riders.
Definition Yolo and Hold
- Yolo is the strategy where you try to build as little as possible while holding as much as possible, meanwhile pushing wisps and lumberjack. Pushing harder gives you the advantage of having more lumber to pressure your enemies and being able to recover at a later point with high income. The most important part of the yolo is level 1-6.
Example: Aqua Spirit: One of the best yolos, cheap and holds exceptionally well for its value. With yolo tactics you try to hold levels with low value to get a higher lumbercount very early. But there are obviously exceptions, many units are weak on certain levels like 5,7, 8 or 10. Don't try to hold them unless you got the right units for it. Aqua for example is pretty weak 7 and 10, but it's one of the best when it comes to Level 8. So even without building for Level 7 and pushing hard, you are able to recover by holding 8, take things like that to your advantage. In the midgame stage, high income allows you to recover and pass the value of holders since they have less income to feed them off. Where that point is depends on how fast the game is, what units you have and how much king gold you were getting.
- Hold ist the strategy where you build as much as possible for key levels in order to catch allies leaks and defend the life of your king, so you need less heals in the early game. While your value is the strongest overall, your income will not be that high. This will lead to you having less value at a later point than incomers. But your holding effort might win you the game as you should have more heals to live off as the enemy team that you were able to pressure. The important key levels of a holder are 7,10 but optionally also 5 and 8.
Example: Yggdrasil: With this unit you are strong 5,7 and 8 and you are a really reliable holder, getting some gold feed in level 1-6 will allow you to build up enough defense to hold Level 7 and 8 which will even give you more gold so you are probably able to hold Level 10 aswell. Due to your low income but high value you will be able to be strong on levels like 13,14,15 while slowly getting behind 17,18 and 20 where you have less income to live off. But as in any game there are also special forms of those strategies. Suicide is a special form of the Yolo, it means that you push income really hard but don't plan to come back into the game later on, so you're basically pushing as much as possible and leak most of the early and midgame levels. Semi-Hold is a special form of the Holder, it means that you will try to hold your lane for a special level like 7 or 8 but don't plan to hold a lot of creeps in mid. This allows you to push pretty decent but still collect a lot of Gold on key levels. Back to the top.
Going Yolo Or Hold
If you Yolo or Hold with your Units depends on your units obviously but there are always different ways for a unit to be played. As you know I made a guide to a lot of units and how you CAN play them, but every decision depends on your teammates and the current game situation. Of course I got an example: Imagine you have Archers and you also have 2 people with 2 Yggs each on Level 5, usually people go 3 Elite Archer here, but what for? There's no risk, so you go 2 Small 2 Elite and get much higher lumber early on, this might not suit to every situation so analyze your game and question yourself how good your team does on certain levels and if they need someone to overbuild there to catch leaks or if they have a holder unit that may enjoy some feed. Now regarding the Holder, people will often aim for 3-4 Yggs or 6-7 Harlots, 3 Blaster whatsoever. As a holder it should be your task to hold 7 so you need less heals, but of course there's Immolation, in case of Immolation your team might tell you to push but I would always recommend to go for a build that holds your lane atleast, u were late for pushing already and need to collect this gold, it's very important, also it could save you from 1 heal as well. Enough talked about Yolo/Hold in general, let's talk about which units are suitable for Yolo and Hold. I will not mention every unit, only the ones I suggest building. There are only rare cases where you will not have any of those, I will talk about that later. Back to the top.
| Tier | Yolo | Hold |
| God | Elite Archer / Aqua Spirit / Goblin Scientist / Prisoner | Yggdrasil / Harlot |
| High | Pandaren / Phantom / Meat Wagon / Komodo / Nightmare / Machine Turret | Goblin Blaster |
| Average | Infantry / Orc Warrior / Tree Of Time / Lord Of Death / Sprite | Warchief / Spawn Of Dragon / Grizzly |
Suitable for both:
- Yggdrasil as Tree Of Knowledge
- Spawn Of Dragon – As combination with some pierce or magic damage
- Elite Archer with Polar Bear or Tree Of Time to hold 7
Others:
- Units that Are really bad at being yoloed but also don't convince with their holding qualities.
- Sea Giant – Aim for Hydra Level 5
- Polar Bear / Nightsaber / Revenant / Flying Machine / Ogre Basher / Mudman– Yolo with some weaknesses on several levels
Positioning
Positioning is the key to make the most out of your value. With perfect positioning you can ensure that your units share the damage equally and your main damage dealers stay untouched to deal the most possible damage. The following advices refer to solo building. To get the best possible start, you need to start building at the wall, doesn't matter if you build on the inner or the outer side, just important that the unit you are building can't get surrounded that easily. You're basically using the terrain as much as possible here. Back to the top.
- The right Yggdrasil uses the wall to his advantage, creeps can't surround him completely. Fighting less creeps at the same time makes him hold this wave very convincing.
- As you can see in the left video, the Yggdrasil has a big problem as it gets surrounded by the creeps pretty early, resulting in taking additional damage. Eventually even leading to a leak.
But you will build more than just 1 unit so what are you doing now? Some units will continue using the wall, for example Elite Archer. For all other units applies that you build them shifted.
- As you can see, they share the damage better in shifted positioning as if you build them straight.
A lot of people are building their towers the oracle way from beginning. Even if you have the Oracle for later, you should consider if its worth doing it like this, because it will screw the way your units will get focused. Now you know how you should place your towers, but one question still remains: Which units should I build where? In general tanks belong in front, while damage dealers and auras belong in the back of your legion. But that's too easy and obviously not everything thats important. Some towers do not seem to be "Tanks" as they use Ranged Attacks, this applies to Hydra and Hades, those 2 should always be placed in front as they either split themselves or they summon creeps, this means they will take some initial damage but your melee units will pass them and tank for them instead. This leads to even better damage sharing. Another unit that should be placed in front is the Tree Of Knowledge, this unit explodes when it dies and will damage enemy units, so your units will have to deal with less enemies.
King Spells
The king is the heart of the game. Protect him at any cost. To do this the best you need to understand the kings spells. I will only be talking about the primary spells received after Level 4. Those are Immolation War Stomp and Shockwave. Your king has 1000 Mana and regenerates 3 Mana per second. Let's talk about one spell after the other. Back to the top.
- Immolation
- Immolation is the most popular spell for LegionTD players. It does not cost mana and continuously burns nearby enemies for 12 Damage per Second making it very effective for Level 7. Certainly it also has its down sides as it is not damaging Level 5, 8 or 13 creeps aswell as any other high range or flying unit. This gives teams with Immolation a huge vulnerability on those levels as it can cost many heals if you leak those levels without having a lot of king upgrades. Immolation is also known to be strong on Level 14 and 15 as it passively burns down those enemies while you can focus the ranged Attackers. The Immolation passive does have little to no impact on late game levels as the Hitpoint Counter of those units is way too high and Immolation does not scale.
- War Stomp
- War Stomp is one of the active spells that includes a cooldown and requires Mana. The active cooldown is 9 Seconds while it cost 250 Mana. This seems fair regarding that it also stuns all enemies affected for 1.25 seconds. Stomps range is the same as Immolation aura but it has the benefit of hitting flying melee units, making it incredibly important on level 5 and 13. For Level 5 for example, 3 Stomps are enough to kill all Hawks when they are not being healed by a hermit. The situation is a little different when it comes to Level 7, these creeps have 213 HP which means that 4 Stomps which is 1000 Mana do not kill those, they will leave the creeps at 33 HP without being healed. Waiting for a 5th stomp is extremly dangerous since it takes 83 seconds AFTER the 1st stomp to regenerate this mana. Many kings die in this time without adequate HP and Regeneration Upgrades. So what's the solution then? Just forfeit when you get stomp? NO! There are simple tactics making it possible to still survive these levels even with a super high leak amount. But that's gonna be featured in the next guide about king control. To complete talking about stomp, you should be cautious about Level 8 as it is not giving any advantage here, similar to Immolation. It's very useful on Level 10 though against low sends. As you can save a lot of HP by stunning the bosses and killing them one by one.
- Shockwave
- Shockwave Is the other active spell and actually it is the spell that most people hate. I don't support this behaviour and show you that it can be very useful on certain levels. Shockwave has a 22 second cooldown and needs 200 Mana, at first glance you can see that you don't get out of mana as quickly as with stomp so you can be a bit wasteful. But care for the long cooldown. To start with a big pro, Shockwave is the only spell that can help mid holders as you are able to reach the fighting area. This can be super helpful for Level 7 midholders, as they need less hits to clear the creeps. For Level 5 it is the average skill obviously, better than Immolation but worse than Stomp. You need 2 Shock waves to kill those creeps. On Level 7 it can be very useful as it is also hitting a lot of creeps but you need 3 Shockwaves to kill those creeps actually. This means you will clear this bulk 44 Seconds AFTER the 1st shockwave. Doesn't sound too bad so far. Let's get more Pros. It is the only spell that can damage Level 8. 2 Shockwaves on the Level 8 Creeps are even enough to kill them. And it is the best spell for Level 10 when it comes to a huge leak of Wyverns. Waving the Wyverns and then hitting them with atleast 28 King Attack will onehit them, other spells will always take 2 Hits for the Wyverns resulting in a lot more damage onto the king. Shockwave then loses relevance again after Level 12 and 13 as it is providing the lowest damage output there comparing to the other spells.
King Control
Controlling the king is a mystery for itself. Everyone has other preferences so the opinions might distinguish. In this chapter I will try to explain to you how you should up your king, what units you should focus and what else you should pay attention to. Note that I will focus on the Level 7 King Upgrades and Control. Additionally I will also show you king control examples to get a better understanding. Keep in mind that you can queue up attacks with Shift so you don't need to change the target with a click every time. Back to the top.
- Level 5
- The first Level where the King Spell has any relevance, although early into the game, it can blow some heals already under bad circumstances. Always kill the Sends first and care for Hermits that could heal up the creeps. As mentioned in the King Spell Video, Stomp is the best ability here, 3 Stomps and all Birds are dead. In case of a leak, only up HP and Regeneration. Same Upgrades for Shockwave, Here you need 2 Waves to clear or 1 Wave and a normal Auto Attack. Immolation is kinda different. No possible damage to the Birds so you have to up the king much more to avoid multiple heals. I recommend going for 2 Attack which will make you 2Hit the Creeps and as much HP and Regeneration as possible. It's not uncommon to lose 1 or 2 heals here with a big king leak.
- Level 7
- Immolation is the strongest spell for 7. Do as much HP as possible to avoid a heal, if there are some sends you might need one anyway, if there are mass Wyverns you should also consider to up some Attack to clear them faster. Focus them first anyway, followed by Hermits and then the Melee Units. Without send, just attack each creep once so they die a little faster.
- War Stomp: Go for 6 to 9 Attack depending on how many Sends there are to kill, max HP and go for a lot of Regeneration. Kill Hermits first, then Wyverns. You can start attacking Satyrs below the King as they won't get the Healing Aura of the Hermit, if you hit them once and Stomp 3 times they will be dead. Without any send I recommend to go for 2 Attack only and hit as many creeps once as possible, if there are some Furbs, you can ignore them, just try to get a decent timing with the Stomps. You can see an example in the video.
- Shockwave: Here you go for 11 Attack usually and also as much HP and Regeneration as possible. Before the Sends arrive you can hit each Satyr once and Wave when you need to change the focus to the Sends. This way you clear some Satyrs already. Kill Wyverns first as they provide the highest damage output. Care to kill Hermits and Furbs since they won't make you 1Hit with Shockwave + Auto Attack
- Level 8
- There are less possiblities for Level 8 as only 1 Spell has impact on the Creeps. In general 6 Attack will make you 2Hit and 18 Attack will make you 1Hit Creeps, If you use Shockwave 6 Attack will be enough to kill. Focus down heavy sends like Commander and Wyvern before you go to the Acolyte Creeps. Don't forget to use Shift to focus Acolytes next to each other so the king needs less time to turn, this can make a huge difference.
- Level 10
- This Level is about killing the bosses with a low amount of HP while taking care of Wyverns that could deal significant damage. If you have Wave and they send a lot of Wyverns you should go for 28 Attack so you can Wave and 1Hit them, with other spells just get a good amount of Attack and HP, add Regeneration if you still have Lumber left.
- Mid Game
- On 13 and 14 you might have to face Warlocks, Frostwolves and Gargoyles, attack them in this order. Level 15+ you should still focus Warlocks and Frostwolves, if there are any and go for Krakens next as they slow down the King Attack, Demons after and then you go for all the remaining Melee Units. To complete this chapter, you should go for the same order again on 20 but kill some Turtles before if they are low already. Care again since King acts weird on 20 sometimes.
Mercenaries
Mercenaries are the units you can hire in your barracks to help attacking the enemy. They will support creeps on the enemy spawn. Mercenaries require Lumber, between 20 and 1500 and not all of them are available from the start. Most of them award Income in a 20/1 relation. Others award less, but provide creeps with useful Auras. Which Units you send is your decision as it distinguishes from Round to Round. Your enemies units also have some impact on the decision. The following will show you the strengths of mercenaries and provide you with useful information on when to send them. Back to the top.
We start with the first barrack. 12 different Units and all of them are send-able from the beginning.
- Militia, weak but cheap. Used on Boss or Lategame Levels to make up more time for the big units to attack.
- Bowman, same as Milita, but ranged so some units have to cover some distance first. Also strong on Boss or late-game Levels but often seen as a small aid on 2 or 3.
- Ghoul, pretty fast, so he often makes units split or let them have a different focus, used on Boss or late-game Levels.
- Warrior, strong attacker, has the ability to stun. Exclusively used for Level 1.
- Whelp, pretty weak flying unit. Don't use it.
- Hermit, Has a Regeneration Aura, great as aid on 3,5,7 or 13,14. Perfect use against Warstomp or Shockwave.
- Dino, stronger than Whelp but very slow Movement. Often used for Level 2 if there's lack of Lumber.
- Commander, Damage Aura, mostly used on ranged Levels.
- Furbolg, very useful melee attacker with Armor Aura, essential for Levels like 2,3,5,7,10,13 or 14.
- Wyvern, the better whelp. Essential when trying to damage the enemy King. Usage on 7, sometimes 8 and 10.
- Chariot, ranged siege attacker. Rarely used, but can be useful on Level 6 if the enemy is weak there.
- Blood Orc, the king of the first barrack, super strong melee attacker. Used to crush Holders for example on 7 but pretty weak versus King because he arrives before other units. Used on 2 (if possible),3,5,7
The following units get unlocked after Level 10. They are available as soon as the Level 10 timer hits 0. They feature stronger Mercenaries that scale better into Mid- and Lategame Stages.
- Frostwolf, attackspeed debuff, pretty useful for 13 or 14.
- Ice Troll, just pretty useless.
- Warlock, reduces armor of his target. Very useful versus tanky fighters. Used on pretty much every 13+ Level.
- Pandaren, strong solo unit but doesn't provide anything special beside his Self-Regeneration. In exceptional cases used on 13 or 14.
- Ballista, strong ranged attacker that is used for giving full Income. Usage on Arena and 12.
- Shaman, buffs single Creeps, used on Boss or Lategame Levels.
- Pudge, melee attacker that grants a Lifesteal Aura. Not used very often but it can be useful on Mid- or Lategame Stage.
- Gargoyle, the better Wyvern. Really strong ranged damage that is also super useful for attacking the King. Used on 13 and 14.
The following units can be send after Level 15. The barracks will reset once again when the Level 15 timer hits 0, so you actually have about 3 seconds time to send those units for Level 15. Consider which units you wanna send for Level 15. Most people want to send a Demon+Kraken which would be 2100 Lumber or even a Behemoth which is 2600 Lumber. Find the Hotkeys for those summons, they should be X and V for Demon/Kraken or X V and Z for Demon/Kraken/Behemoth. Then concentrate when the timer runs out. You will have to click the advanced barracks again because they will reset so you can't trust your previously selected control groups. Click them again when they reset and use your hotkeys, for example X V and Z to send them. Voilà your enemy gets super strong sends now. Back to the remaining units:
- Behemoth, Armor Aura, just a tougher enemy than Furbolg. Used on 15+ Levels.
- Kraken, slows and poisons his victim, also provides a better healing Aura. Used on 15+ aswell.
- Infernal, big and tough attacker but attacks pretty slow and doesn't provide any bonus to the creeps.
- Demon, the ultimate unit to send. Provides Movement Speed and Damage Aura, extremely strong with his range.
- Additionally, all of the last mentioned units are Spell Immune. This means they can't be crowd controlled or damaged by spells (for example Hellraisers).
Bounty, Income and King Gold
The following guide features important numbers and data that you should remind when playing LegionTD. It will help you play more efficient and you'll be able to plan ahead. Indispensable when you play units like Yggdrasil, Lord of Death, Sea Giant or many others. It will also show you how to keep track of the King Gold provided. Back to the top.
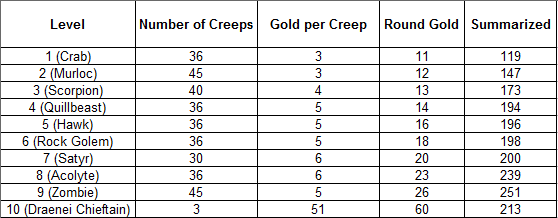
- Bounty: Bounty is split into two parts. First of the amount of gold you gain for killing a creep or a mercenary, secondly a fixed amount that you get at the end of the round. To gain a better overview of how much exactly you get, here's a small table, featuring Level 1 to Level 10.
- Mercenaries: Killing Mercenaries also awards Bounty. This Bounty actually depends completely on the lumber value of the unit itself. So a Bowman will grant 2 Bounty, a Warrior grants 3 Bounty even though he only awards 2 Income. Mercenaries don't lose a part of their bounty when entering mid, they will always give full bounty.
- Income: Income is the second part of Gold you get at the end of the round. It depends on Mercenaries sent and King Upgrades done. It's the only part that you have some fine-tuning influence on so you might use it to get the fighters desired, good examples are probably Prisoner & Phantom which require 6 Income for Level 2.
- King Gold: King Gold is the last part of money that you earn when completing a round but it's only assigned if there were Creeps leaking to ones or both teams king. Every player in the game gets the exact same amount of king gold, but you might wonder how it's calculated. Creeps that enter the middle area get a status effect which shows their percentage of bounty, it looks like this (https://imgur.com/CaehSMD). 100% means that they grant full bounty. If it shows 0% there will be no bounty at all, but it can also show something in between. The percentage depends on how many creeps the player leaked already and how close he is to the recommended value. Mercenaries always award full bounty regarding their lumber cost in a 20/1 ratio. To start with a lower amount of variables we take 1v1 as example. King Gold is calculated by adding the leaks of both players, small example: Both players leaking Level 1, Player 1 leaks 5 Crabs with 60-70% each. Player 2 leaks 9 Crabs with 100% each and 2 Warriors. Level 1 Creeps are worth 3 Gold so 60-70% equals 2 Gold. That makes 10 Gold on his side, adding 9*3 Gold for the Crabs of the other guy and another 2*3 Gold for the Warriors, coming to 43 Gold in total (5*2 + 9*3 + 2*3). Both players will get the 43 Gold, meaning that Player 1 had a larger profit here. If only 1 side leaks, both teams will aswell get the same amount of King Gold. If you sum up king gold in 4v4 you will have to divide it by 4 in the end (A + B + C + D) + (W + X + Y + Z) / 4. Round Gold, Income and King Gold will add up at the end of the round. Since you got some knowledge about them now you can use them to your advantage. It will help you plan more precise and takes you 1 step ahead of your opponent.
Unit Guides
Wolverine
Wolverines are known for their luck-based strength on boss levels, but their early game should not be underrated. Their strength also lies on clearing Level 1 vs Warriors or doing good on Level 3. Their midgame strength spikes at Level 15 and 20. Main weakness are ranged levels just like Level 8 or 12. Be sure to get good value for those levels if you want to avoid leaks. I suggest to start with 2/0 because it allows you to get 5 Blood Orc Warriors for Level 3 which is essential to hold against a good send, this is also enough to hold Level 4 and upgrading 1 Wolverine is often enough on Lvl 5. I suggest to up a Wolverine every round so you get 2 for 6, 3 for 7 and 4 for 8 if the amount of king gold allowed it. I usually stay 7/2 until the end of Level 8 to ensure that my value is able to hold anything on 10. You can push 7/3 after 8 because your value for 9 is definitely enough at this point. Level 10 should manifest 6 Wolverines or even 7 if you were holding some teammates leaks earlier. Level 10 Crits may not appear as you want to them, especially a big send can slow down your clearing enormous. But don't worry, Wolverines are good value for midgame Levels, especially with auras like Overseer or Troll Fighter they can kill Levels like 15,17 or 20 even vs good sends. So be sure to place down a lot of Orc Warriors, usually 2 full rows are good, then try to get as many auras as possible and you're on the safe side. Back to the top.
| Strenght | 1, 3, 10; 15, 17 with auras; 20 | |
| Weakness | 8; 12 (depends on 10) | |
| Synergy | Overseer, Auras, Goliath, Hades | |
| Level | Value (if no send) | Aimed Lumber Ups |
| 1 | 240 | 2/0 |
| 2 | 340 | 2/0 |
| 3 | 500 (420) | 2/0 |
| 4 | 500 | 4/1 - 5/1 |
| 5 | 650-690 | 5/1 - 6/1 |
| 6 | 800-820 | 5/2 - 6/2 |
| 7 | 950+ | 7/2 |
| 8 | 1100+ | 7/2 |
| 9 | 1200+ | 7/3 |
| 10 | 1500+ | 7/3 |
Phantom
Phantoms are one of the best damage dealers without a doubt. They are picked for being a good early yolo unit and being super useful in midgame stages. Of course they also have a big weakness Level 10, don't expect them to kill anything there. Reason for being weak Level 7 and 8 is the Light Armor and the low amount of Hitpoints. They have a special start cause they require a Level 2 Send if you want to play it the classic way. You start 2/0 and place down 2 Phantoms, send for 6 Income to Level 2 so you get 125 again to build for Level 2. I suggest upgrading the middle one of your phantoms to a hellraiser for Level 3, they have a higher dmg and less cooldown, your remaining gold should be enough to even add a t1 in front of the hellraiser, this helps them surviving for a bit longer. You're safe for Level 4 and I would build another Phantom for Level 5, you can even add another t1 in front if you want. Same value holds Level 6. Try to get 7/4 here if you can, since you won't be good Level 7 or 8, except you have units like Polar Bear or Tree Of Time. You should get 7/5 by Lvl 9, 950 value of Hellraisers/Phantoms can hold this Level most of the time. Your Level 10 is one of the worst of all the LegionTD units so don't build for it if you can just go 7/6 instead, stay 7/5 if you have extremly good units for 14/15 or 17. For Midgame build up to 8 or 10 Hellraisers, add some tanky Units in front and some demon killers in the back, you need demon killers because Phantoms/Hellraisers can't attack Spell-Immune targets like Demon/Kraken/Behemoth, this should help you clear midgame levels pretty good. Back to the top.
| Strength | 11-19 Good Early Yolo, Good Income | |
| Weakness | 7, 8, 10, 20 | |
| Synergy | Big Tanks in front, Demon Killers in the back | |
| Level | Value (if no send) | Aimed Lumber Ups |
| 1 | 250 | 2/0 |
| 2 | 375 | 2/0 |
| 3 | 505-525 | 2/0 |
| 4 | 505-525 | 4/1 - 5/1 |
| 5 | 630-650 | 4/2 - 5/2 |
| 6 | 630-650 | 5/3 - 7/3 |
| 7 | 755+ | 7/3 - 7/4 |
| 8 | 885+ | 7/4 - 7/5 |
| 9 | 1000+ | 7/4 - 7/5 |
| 10 | 1300+ | 7/5 |
Hydra
Hydra is a very useful tanky ranged unit mainly used to hold 15 and 20. Although the start isn't as strong as other units, Hydra is definitely useful in mid and late stages of the game. It synergizes with the Bottom Feeder, because a Hydra is expensive and u want to save for it Level 5, aswell as Auras that support the Hydra in damage dealing or surviving just like Helicopter, Ice Troll, Witch Doctor. You start with a Sea Giant, keep in mind that the Sea Giant alone does not hold Level 2, so you need to plan ahead a bit. Don't overpush after Level 3 since you need to save 140 Gold here, with 6 Income and holding Lvl 4 you will get +200 Gold there so you can get your Hydra Upgrade for 340 Gold for Level 5. You don't need the Hydra earlier, because a Sea Giant and 120-150 bonus value are enough to hold Level 4. Your Lumberjack should be somewhere 2/0 and 4/1, which is not much but now it's time to push for you. You can get up to 7/3 until Level 7 if you want to. If you get extremely good units for Level 10 you can even stay 7/2 to ensure you hold more creeps on Level 7,8 so you can gather up more Value for 10. Sometimes it is good to add a Sea Giant for 8 so you are able to get 2 Hydras for Level 10, but in terms of focusing Level 10 Bosses it is better to have the damage behind the Hydra. If you did good you can have up to 1800 value on Level 10 and hold your lane + some bosses in mid, always depending on the units you got and how slow the game was / leaks etc. If you made it past Level 10 push 7/5 or even 7/6 regarding your teams' future plan. What you want to do now is getting more Hydras if you expect a send lvl 15 or 20 or getting a lot of Ranged Damage behind your Hydras. Why behind? Although Hydra is Ranged it is one of the tankiest units in the game, based on Value/Gold so you want to be sure they tank while your damage dealers do their best. Back to the top.
| Strength | Good Mid- and Lategame | |
| Weakness | Slow Pusher, 8 | |
| Synergy | Crab, Heli, Other Auras, Good Range Units in the Back | |
| Level | Value (if no send) | Aimed Lumber Ups |
| 1 | 280-300 | 1/0 |
| 2 | 340-400 | 1/0 - 2/0 |
| 3 | 410-520 | 2/0 - 4/0 |
| 4 | 410-520 | 4/1 - 5/1 |
| 5 | 675-690 | 5/1 - 6/1 |
| 6 | 690-750 | 6/2 - 7/2 |
| 7 | 900-1000 | 7/2 |
| 8 | 1100+ | 7/2 - 7/3 |
| 9 | 1300+ | 7/3 - 7/4 |
| 10 | 1500+ | 7/3 - 7/4 |
Infantry
Infantry is the base for 2 important units, Pyro and Zeus. While Pyro is an overall good early yolo unit, the Zeus is mainly used to clear Level 10. You start off by placing 1 Pyro and going 2/0. For Level 2 you can build various ways, if you only place 1 Infantry, a Furbolg-Send can make you leak a lot of creeps. So you either stay 2/0 until you know if they send or not, or you add a second Infantry in the back, because it will make you hold much better. For Level 3 you can up to another Pyro or build a Zeus already. Same Units also hold Level 4, 2 Pyros would be enough here. For Level 5 you should get 3 Pyros, 2Pyros 1 Zeus or even another Infantry added to this. First 2 options are often based on your aggro, so if you're unlucky you leak. Same Units hold 6 aswell so you can push your lumber, I highly prefer to stay 7/2 to get more value similar like Wolverines, but that's your decision. Both Pyro and Zeus are not very good Level 8 so here's the reason why I stay on 7/2 often. After this Level you should be able to push since Pyros are pretty good Level 9. Get as many Zeus as you can for Level 10. I don't guarantee for you to hold Level 10 since it's always a matter of Placement, Boss Spawning, Number of Sends, so just too many influencing factors. For Midgame it is important to know that Zeus are pretty much useless after 14, their main use is to add them as demon-killers behind big tanks or phantoms. Back to the top.
| Strength | 6, 7, 10 Good Midgame with Tanks/Auras | |
| Weakness | 8, 15, 17 | |
| Synergy | Crab, Heli, Polar Bear, ToT, Auras, Hades ToK | |
| Level | Value (if no send) | Aimed Lumber Ups |
| 1 | 230 | 2/0 |
| 2 | 350(290) | 2/0 - 3/0 |
| 3 | 520(460) | 2/0 - 3/0 |
| 4 | 520(460) | 4/1 - 5/1 |
| 5 | 675-690 | 5/1 - 6/1 |
| 6 | 690-750 | 6/2 - 7/2 |
| 7 | 900-1000 | 7/2 |
| 8 | 1100+ | 7/2 - 7/3 |
| 9 | 1300+ | 7/3 - 7/4 |
| 10 | 1500+ | 7/3 - 7/4 |
Revenant
Revenants are not known for being one of the best yolo units in the game. Nevertheless they can be very useful on key levels. First of they can challenge top yolos if you got the Egg Sack or Polar Bear for extra utility. Speaking of the Revenant as itself, they are strong on early Levels, expcept for 3 and 6 where u got the armor disadvantage, while they are pretty bad on 7 and 8. Start with 2 upped Revenants and 2 small Ones if u don't have a tanky T2. Aim for 5 Revenants or 4 Revenants + some tanks in front if you got them for Level 3. Same Should hold Level 4 under normal circumstances, for Level 5 you should get over 600 Value, if enemy sends a blood orc you can't do much about it since Revenants are not tanky at all. For Level 6 over 700 value is recommended. Don't try to hold anything on 7 or 8, you got 2 options here though. First one is you value up for 7,8 to need leak that hard so you get value to do good on 10 or you yolo a bit harder and try to manage getting about 1000 value for 9 so you get this bounty atleast. Revenants are decent Level 10 but not more, if you want them to be more than that you need a good tankline which means lots of Ogre Bashers, Polar Bear or Magnataur or even some bigger units. Otherwise your Revenants will die pretty quickly without dealing too much damage. Speaking of Midgame, Revenants will leak Level 12 unless you got really good value, also Revenants are often used to scare of an enemy send on 15. They are one of the best units for this Level but they only clear the Wave pretty quick, when it comes down to killing a Behemoth or a Demon they are much slower and leak those even with decent value. Back to the top.
| Strength | Good DPS, 2, 4, 5, 9, 10, 15 | |
| Weakness | 3, 6, 8 | |
| Synergy | Egg Sack, Polar Bear, Ogre Basher, Good Tanks, Helicopter | |
| Level | Value (if no send) | Aimed Lumber Ups |
| 1 | 240 | 2/0 |
| 2 | 300-340 | 2/0 - 3/0 |
| 3 | 440-520 | 2/0 - 3/0 |
| 4 | 500 | 4/1 - 5/1 |
| 5 | 640-670 | 5/1 - 6/1 |
| 6 | 740-770 | 5/2 - 6/2 |
| 7 | 800+ | 7/3 |
| 8 | 1000+ | 7/3 |
| 9 | 1200+ | 7/3 |
| 10 | 1500+ | 7/3 |
Komodo
Komodos are an average yolo unit that has a decent early game. They are the slowest Level 1 Killer because of their Submerge Ability. This ability will let them disappear for a short time, especially on Level 1 this causes the level to end much later than usual. So if your team wants time, try komodos. Otherwise it's pretty similar to Pandaren or Goblin Alchemist, you get 1 Komodo on first Level while 2/0, get a second one on 2 and if you don't expect a send on Level 3 you don't need to add much to it. For Level 4 I recommend 3 Komodos, since Komodos are 2Hitters here like many other units so they require some overbuild here. If you don't have anything to add then 4 Komodos for Level 5 and 6 is the best way. Units you can add to Komodos are mostly Auras or overall good ranged units, I prefer the Young Witch Doctor because the komodo fights take pretty long so his aura is doing work. As always don't try ot overbuild for 7 since you are not pretty good here, if you stay 7/3 you can hold pretty much of Level 8 as share damage pretty good. I prefer to push to 7/5 with Komodos as long as I don't have units to hold Level 10, so leaking Level 9 is not really a shame. Komodos are weak 10 and unfortunately not good at midgame either, the upgrade of the komodo isn't very good aswell, so just stay with the Komodos you got and reroll for anything midgame relevant. Back to the top.
| Strength | 3(if no Furb), 5, 8, Ability: Submerge, Slow Killing | |
| Weakness | 1, 9, 10, Pretty dead value in Midgame | |
| Synergy | Young Witch Doctor, Crab, Good Ranged Units | |
| Level | Value (if no send) | Aimed Lumber Ups |
| 1 | 180 | 2/0 |
| 2 | 360 | 2/0 |
| 3 | 390-520 | 2/0 - 4/0 |
| 4 | 540+ | 4/0 - 4/1 |
| 5 | 620-720 | 5/1 - 6/2 |
| 6 | 740-770 | 6/2 - 6/3 |
| 7 | 800+ | 7/3 |
| 8 | 1000+ | 7/3 |
| 9 | 1100+ | 7/3 - 7/4 |
| 10 | 1300+ | 7/4 - 7/5 |
Goblin Alchemist
Goblin Alchemist also known as Blaster is a durable holder unit that can perform good on Lvl 7 and Midgame Levels, such as 12,14,15. Big weakness is the Lvl 1 Send, without a lot of kinggold you miss your 2nd Alchemist and will need to improvise. Most people would still risk this though. Another big weakness is that you need to save gold for a Blaster for Lvl 4 since Alchemists are really weak due to the Light Armor. Adding another weakness to the list, if enemy team spotted your Blasters they might send a Furb on Lvl 5, which causes them to need 2 Hits for the Creeps. For Level 7 there are several possibilties, you can either go for 3 Blasters, maybe even with some additions, which will hold pretty good or you go for only 2 Blasters and go for more ranged units behind, where you are able to invest more into Lumber research. 3 Blasters alone will hold Level 8 unless enemy sends here, which is possible Blaster got problems vs send on 8. For Lvl 10 you need to evaluate if your other units are good for this Lvl or not. Blasters alone are not very good since they suck at clearing Mass. If you reached midgame your units are finally useful again. Blasters are the best Lvl 14 Unit and they should not be underrated for 15 aswell. 17 and 20 they only function with a lot of aura and ranged support. Back to the top.
| Strength | Good Mid- and Lategame | |
| Weakness | Slow Pusher, 8 | |
| Synergy | Crab, Heli, Other Auras, Good Range Units in the Back | |
| Level | Value (if no send) | Aimed Lumber Ups |
| 1 | 180 | 2/0 |
| 2 | 360 | 2/0 |
| 3 | 400-440 (360) | 2/0 - 4/0 |
| 4 | 580-660 | 2/0 - 4/0 |
| 5 | 760-880 | 3/0 - 4/1 |
| 6 | 980-1060 | 3/0 - 5/1 |
| 7 | 1200-1280 | 3/0 - 5/1 |
| 8 | 1200-1450 | 6/2 - 7/3 |
| 9 | 1200-1450+ | 7/3 - 7/5 |
| 10 | 1380-1800+ | 7/3 - 7/5 |
Pandaren
Pandaren are a solid early unit that is pretty similar to how Komodo is played. As Komodo they are solid on first 6 Levels but fall off on later stages of the game. They have great synergy with the Young Witch Doctor or the Overseer, but even without Auras you are good to go. Starting 2/0 as most Units only using 1 Pandaren 1 Frost Wolf, get a 2nd Panda for Level 2, add some more Frostwolves for Level 3 or some Aura if you have it. For Level 4 I like to get a 3rd Panda unless you got some aura already that makes you hold. For Level 5/6 you should have 3 Pandas + Aura or 4 Pandas, this is pretty solid and does pretty well even vs small sends. As many other units they suck Level 7 so push your lumber to alteast 7/3. With 7/3 you might be able to hold Level 8 aswell but after 8 it's the point where you should definitely start pushing towards 7/5 since your units do not have the greates impact at Level 10. Reroll after 8 to see if you get anything good to hold 14/15/17/20 or whatever you need since Pandaren are really prone in midgame stages and don't serve as a good holder unit here. Back to the top.
| Strength | Solid Early Game | |
| Weakness | Blood Orcs, Dead Value in Midgame | |
| Synergy | Young Witch Doctor, Overseer, Other Auras, Good Range Units | |
| Level | Value (if no send) | Aimed Lumber Ups |
| 1 | 225 | 2/0 |
| 2 | 360 | 2/0 |
| 3 | 405-450 | 3/0 - 4/0 |
| 4 | 540+ | 3/0 - 4/1 |
| 5 | 640-720 | 4/0 - 6/1 |
| 6 | 640-720 | 5/2 - 7/2 |
| 7 | 640+ | 6/3 - 7/3 |
| 8 | 980-1060 | 7/3 |
| 9 | 1100-1300+ | 7/3 - 7/4 |
| 10 | 1200-1350+ | 7/5 |
Nightmare
Nightmares are one of the best early Yolo Units in my opinion. They function with a lot of auras, just like Young Witch Doctor, Ice Troll or Overseer.Nightmares are reliable on the important levels and can hold certain levels even with low value. I start off 2/0 with 1 Nightmare and a T1 or T2 if it's cheaper than 35g, but you can also skip it. Level 2 is the first point where you can go different ways. You can stay 2/0 and build up with something like a 80g unit, keep in mind that u need 215g for Level 3. Other possiblities: Go 3/0 if you have added somethign small already and pray enemy doesn't send here, or my favorite build where you start the 3rd wisp 15 seconds before the round starts to see if they send or not, so you can still cancel it if you need the Gold for 2nd Nightmare Level 3. P.S: The best addition is 2 Landmines for Level 2, build them 3 full spots behind Nightmare and you easily hold versus a Level 2 Send. The rest of the Nightmare Yolo is pretty obvious, get 2nd Nightmare Level 3, save some gold (not much) for Level 4 so you can get 3rd Nightmare Level 5, that's more than you need and you will be fine for Level 6 aswell. Stay 7/3 now if you want to hold Level 8,10 (you need good units for Level 10 obviously) or start pushing hard, so you leak Level 8 but might hold Level 9 again, about 1k Value holds here. Nightmare is not the best midgame unit but it could be worse. They perform good on 13 and 14, but for Levels like 15,17,20 you simply need something else. Back to the top.
| Strength | Strong Early Game, especially 3, 5, 9 | |
| Weakness | 2, 4, 7, 10 | |
| Synergy | All kind of Auras, Good Range Units, Landmine ;) | |
| Level | Value (if no send) | Aimed Lumber Ups |
| 1 | 215-250 | 2/0 |
| 2 | 235-305 | 2/0 - 3/0 |
| 3 | 430-510 | 2/0 - 3/0 |
| 4 | 470+ | 4/1 - 5/1 |
| 5 | 645+ | 4/0 - 6/1 |
| 6 | 645+ | 5/2 - 7/2 |
| 7 | 645+ | 7/3 - 7/4 |
| 8 | 800-1100 | 7/3 - 7/5 |
| 9 | 1000+ | 7/3 - 7/5 |
| 10 | 1200+ | 7/3 - 7/5 |
Dwarven Engineer
Dwarven Engineer is one of the best Units of LegionTD caused by its outstanding early game and usage in midgame stages. It can be combined with many good units or Auras to make it even stronger in early- or midgame stages. I will talk about the safe start since there are different ways on how to start with this unit, but I prefer this one: Starting 3/0 and doing 3 Small Goblin Scientiest and 2 Dwarven Engineers in the back. You can send for 1 Income Level 2 here, but that's optional, without sending you will only up 1 more Dwarven Engineer for 2, otherwise you add another T1. Level 3 should bring you somewhere between 320 and 370 value depending on you expecting a send or not. I like to get 460 Value for Level 4 since it can be very random how much you hold with 420 or 440, therefore I get 6 Dwarven Engineers and 1-2 small ones here. Don't build for Level 5 at all and get 510-560 Value for Level 6, after this you should be 7/4 and use 15/15 on your farm. I like to save gold here to get a mutant for 8, but it depends on the amount of king gold on whether you got some feed earlier. So if you can't get it, combine it with some other units, if you can, up 1 Mutant and Juice it for Level 8,9. Also push 7/5 if you have the chance to since you don't hold anything on 10. Important for midgame stages is that you should up as many Mutants as possible if you don't have any of the strong Tank Units to help you. Also 1900-2000 Value holds 12 without juicing usually. If you passed your weaknesses on 13,14 you can be a really good holder 15 if you juice and you are the owner of the best Level 17 Unit aswell. Remember to juice on the levels you expect a send on. It will be worth. Back to the top.
| Strength | Strong Clear 1, 2, 3, 4, 6, Strong Pusher, 17 | |
| Weakness | Sucks Level 5 | |
| Synergy | Egg, Polar, Tot, Helicopter, Hydra, ToK, Hades | |
| Level | Value (if no send) | Aimed Lumber Ups |
| 1 | 200(140) | 3/0 - 3/1 |
| 2 | 250-270(200) | 4/0 - 4/1 |
| 3 | 370-390(300) | 4/0 - 5/1 |
| 4 | 420-460 | 6/1 - 6/2 |
| 5 | 420-460 | 5/3 - 6/3 |
| 6 | 510-560 | 5/3 - 7/3 |
| 7 | 510-560 | 7/4 |
| 8 | 810+ | 7/4 |
| 9 | 900+ | 7/5 |
| 10 | 1200+ | 7/5 |
Prisoner
Prisoners are a solid start that can be the foundation of an either strong income game for you or a semi-hold transitioning into a good value for midgame stages. They function very well with almost every ranged unit behind it, for example Phantom, Revenant, Infantry or Nightsaber are really good additions to prisoners. Prisoners are being started off like Phantoms, you get 2/0 and place 2 of them, send for 6 Income and get a 3rd one, if enemy sent already you can stay on 3 Prisoners for Level 3 and 4, otherwise get a 4th one and you're a brilliant holder vs Level 3 send. For 5 I like to mix them with ranged units or just get 5 Prisoners or up 1 to a Maverick, on 6 I usually just add sth like T1 or T2 in front to tank a bit. With some early feed you can easily go 7/4 before Level 7, otherwise I recommend 7/3 to hold Level 8 aswell, 1k Value should do their job here. For Level 10 you just have to evaluate if you have other towers for it or if you want to push to 7/5 instead. On Midgame stage Prisoners and Mavericks are not more than average, don't build any more of them unless you really got nothing else to build. Back to the top.
| Strength | Good early Tank, Solid 1-4, Good 8 | |
| Weakness | Can be unlucky on 5, 6, Dead Value in Midgame | |
| Synergy | Good Range Units | |
| Level | Value (if no send) | Aimed Lumber Ups |
| 1 | 250 | 2/0 |
| 2 | 375 | 2/0 |
| 3 | 500(375) | 2/0 - 4/1 |
| 4 | 500(375) | 4/1 - 6/2 |
| 5 | 625-670 | 5/1 - 6/2 |
| 6 | 670-710 | 6/2 - 7/3 |
| 7 | 795+ | 7/3 |
| 8 | 1000+ | 7/3 |
| 9 | 1000-1200 | 7/3 - 7/5 |
| 10 | 1300-1600 | 7/3 - 7/5 |
Grizzly
Grizzly is a powerful holder for early and midgame stages with only a few exceptions. Note that Grizzly 1-hits Level 1-4 and Greymane 1-hits Level 5+6, this will be useful later on to determine how much you have to build on certain levels. You start with 1 Grizzly and a T1 or T2 and save atleast 60 gold here so you can get a 2nd Grizzly Level 2. This also means you have to stay 1/0 during this time. If enemy sent Level 1 or 2 you can stay on 2 Grizzlys and your T1/T2 throughout Level 3 and 4, push all you can until the end of 3, you have to get a greymane for Level 5 in order to hold your lane, this should get you to 600+ value and around 5/1. If your team is really weak Level 5 you can also go for 2 Greymanes here. Same build holds Level 6 aswell so you can push around 7/2 to get another greymane Level 7. This will help you clear a good amount of this level. Level 8 is your biggest weakness, try to get some ranged units in addition, after Level 8 you should push to 7/5 unless you try to hold Level 10. Level 9 is no problem with atleast 1000 value so you don't lose that much gold in the early stage overall. This build will lead you to having a good midgame unit with decent value to maybe even hold 14/15/17 if you got fed early or rolled some good auras. Best aura surely is Overseer since Greymane is a strong damage dealer and it keeps him alive for much longer, also look out for Troll Champion or Tree Of Travel since Greymanes tend to walk around a lot. Back to the top.
| Strength | Lvl 3,4,5,6 + 15,17 with good Auras | |
| Weakness | Lvl 1,8,10, Requires Auras to be midgame compatible | |
| Synergy | Overseer, Crab, Other Auras, Good Range Units | |
| Level | Value (if no send) | Aimed Lumber Ups |
| 1 | 220-240 | 1/0 |
| 2 | 360-420 | 1/0 |
| 3 | 420-490(360) | 2/0 - 4/0 |
| 4 | 420-490 | 4/1 - 6/1 |
| 5 | 605+ | 4/1 - 6/1 |
| 6 | 605+ | 6/2 - 6/3 |
| 7 | 770+ | 7/3 |
| 8 | 1000+ | 7/3 - 7/4 |
| 9 | 1100+ | 7/4 - 7/5 |
| 10 | 1400+ | 7/4 - 7/5 |
Spawn Of Dragon
Spawn Of Dragon is one of the less seen holder units on the 1200+ bot, this doesn't mean you should underestimate it. Spawn has eminently strengths on key levels like 1, 3 and 7. You can hard yolo this unit or play it as a holder where I will talk about here. U start off with just 1 Spawn and hope for a warrior send, if not get some t2 t3 or t4 added, depending on what you got. Note that 1 Spawn easily holds unless they send you a Furb. If you expect a Level 3 send, get around 400-450 value, more is not needed since Spawn Of Dragon is really strong here. Try to get enough Range Damage for Level 4 and 5 and plan for a 2nd or even 3rd spawn until Level 7. With 3 Spawns you have high chances of holding your lane, even with enemy send. Level 8 is not really their strength which is not a mystery but they actually do pretty decent if you have around 1100-1200 value, push full 7/5 here if you don't want to hold Level 10, better feed your team some money. Overall Spawn Of Dragon can't carry anything in midgame, 14 might be the best Level but it's not doing as decent as the stats suggest. The real strength of the dragon comes with the lategame, upped to the Dragon Aspect it is one of the best towers here, especially 24 and 27. Back to the top.
| Strength | Good on key Levels 1,3,7 + Strong 20+ | |
| Weakness | Needs strong range Units | |
| Synergy | Auras, Needs ranged Units or Overbuild to hold 4,5 | |
| Level | Value (if no send) | Aimed Lumber Ups |
| 1 | 265 | 1/0 |
| 2 | 265-365 | 2/0 - 4/0 |
| 3 | 315-415 | 3/0 - 4/1 |
| 4 | 530+ | 3/0 - 4/1 |
| 5 | 700+ | 3/0 - 4/1 |
| 6 | 750+ | 4/0 - 5/2 |
| 7 | 950+ | 4/0 - 7/2 |
| 8 | 1000-1200 | 6/1 - 7/3 |
| 9 | 1200+ | 7/3 - 7/4 |
| 10 | 1400+ | 7/4 - 7/5 |
Archer
Elite Archer is the most beloved starting unit. It's easy to learn and actually not that hard to master aswell. Start is simple, 1 Elite Archer while pushing 2/0. Add a T1 vs Warriors if you got something good to block (Gnoll Warrior, Hatchling, Ent). Go 4/0 for Level 2 while adding a small archer in front. If you get a Furb here you might get a problem with the gold for a 2nd Elite Archer Level 3. In worst case, add 1 small Archer in front and 1 in back of the Elite Archer, your build at the wall should look like this now SSES, this way your Elite gets protected and you're able to still hold Level 3 without having 2 Elite, but as I said this is just worst case scenario. Otherwise you add another small Archer for Level 4. You need to decide now if you want the safe way for 5 with 3 Elite Archer or if you risk it and go 2 Small 2 Elite here, while pushing far more. You can be 6/3 or 7/3 here in a good scenario. This way you add 2 more small Archers for Level 6, otherwise just stay on 3 Elite. Get 7/4 and build rest for 7 so you clear some creeps atleast here. From this point, many people just straight push and don't even try to hold Level 10. Archers have a great potential though for 10 so I usually try to hold Level 10 with 7/4. You do this by simply starting to build small Archers after 3 or 4 Elite, this will give you enough Single Target Damage to hold 2-3 bosses, don't expect a lot of mid leaks, that usually does not happen. If you had a good early game with maybe some feed involved you should be 7/6 at arena with 120+ Income and around 1700-2000 value. If you don't have any decent mid game units like Tok, Hydra or Hades, Mutant etc. you should keep massing Archers till the Level enemy is sending. They are great for 13,14 and actually not too bad for Level 15 aswell if you just mass them. For 17/18 a decent value can be good aswell, but it always depends on whether you get Behemoth/Kraken because they slow down the killing speed by a lot. Back to the top.
| Strength | Solid on almost every early wave 13, 14 | |
| Weakness | Blood Orcs on 3,5 + 15, 17, 20 | |
| Synergy | Polar Bear, ToT, ToK, Hades, Hydra, Auras | |
| Level | Value (if no send) | Aimed Lumber Ups |
| 1 | 205 | 2/0 |
| 2 | 255 | 4/0/td> |
| 3 | 410 | 4/0 |
| 4 | 460 | 6/1 - 5/2 |
| 5 | 615(510) | 5/2 - 6/3 |
| 6 | 615-620 | 7/3 |
| 7 | 665-820 | 7/4 |
| 8 | 820-1020 | 7/4 |
| 9 | 1100+ | 7/4 - 7/5 |
| 10 | 1400+ | 7/4 - 7/5 |
Yggdrasil
This is gonna be about Yggdrasil in general and it's Lvl 7 Holder qualities while there is another guide especially for Tree Of Knowledge. Yggdrasil is a holder unit with diverse usages, ranging from Level 5 to Level 7 and 8. The fortified armor and constant healing are ideal if you want to hold in mid after holding your own lane. Commencing with a single Yggdrasil you need to stay 1/0 for Level 1, think of what you're gonna add for Level 2 and 3, 1 Ygg can hold Level 2 but the risk is of getting a send is pretty high, so you might not want to risk it. Level 3 needs around 420+ value unless you got a captain and don't expect send, same for Medicine Man, both hold Level 3 with Ygg. Against a send you need to overbuild here, since Ygg will 2-hit if there's a Furbold on your lane, also keep at least 90 Gold in your pocket, with Level 4 Bounty and 6 Income it will give you enough for another Ygg Level 5, so plan ahead, if you even aim for 4 Yggdrasil I recommend to stay on 3/0 and save more gold. Same Units that hold Level 3 will also hold Level 4. Ygg can almost solo this Level. As said 2nd Ygg for Level 5, 3rd Ygg or some additions for Level 6, Ygg is pretty weak here and then the 4th or 3rd Ygg for Level 7. Note that even 4 Yggs have a high chance to lose the outer Yggdrasils when enemy did a good send, so you would only have 2 Yggdrasils in Mid. Again, same that was holding Level 7 usually holds Level 8, also 9. Yggdrasil is pretty weak 10 but with all the gold you got from holding and good Anti 10 you might be able to to very good there. Otherwise just push 7/5 or 7/6 as soon as possible. Yggdrasils can recover in mid-game with the usage of Tree Of Knowledge, read more on the seperate guide on Tree Of Knowledge. Back to the top.
| Strength | Strong holder 5, 7, 8 | |
| Weakness | 2, 3, 6, 10 | |
| Synergy | Bottom Feeder, Young Witch Doctor, Auras, Good Range Damage | |
| Level | Value (if no send) | Aimed Lumber Ups |
| 1 | 290 | 1/0 |
| 2 | 290-420 | 1/0 - 3/0/td> |
| 3 | 420-515 | 2/0 - 4/0 |
| 4 | 420-515 | 3/0 - 4/1 |
| 5 | 710-870 | 3/0 - 4/1 |
| 6 | 870-970 | 3/0 - 4/1 |
| 7 | 1000-1260 | 3/0 - 6/1 |
| 8 | 1000-1260 | 7/2 - 7/3 |
| 9 | 1100+ | 7/3 - 7/6 |
| 10 | 1300+ | 7/3 - 7/6 |
Tree Of Knowledge
Tree Of Knowledge is one of the upgrades of Yggdrasil and often used to yolo in early game or to clear waves in midgame. The start is almost identical to classic Yggdrasil, only exception is that you need to save 180 Gold at the end of Level 3 instead of 90 Gold so you can affort do up to the Tree Of Knowledge on Level 5. There isn't much to say about how to play Tree Of Knowledge, after you got it on Level 5, you clear this Level and Level 6 without a problem, might look Level 5 though if you got no additions anymore, e.g. when you had Bottom Feeders and sold them but the leak won't be significantly. It does a good job for Level 7 aswell although it does not onehit creeps there if they didn't hit the Yggdrasil a few times, since Level 7 has 213 HP. That's why some ranged dps in the back or some aura can really help you. Level 8 has below 200 Hp again so you onehit them here again but keep in mind that you only hit 15 creeps with this spell and Spell Immune targets do not get damaged by this ability. Level 9 has some more HP so you could build up more value here if you feel like it. You could add another Yggdrasil for example, Tree Of Knowledge is able to kill a Level 10 Boss pretty often and if you even got 2 Tree Of Knowledge, you will be able to clear all the Wyverns as they have below 400 HP. All in all, Tree Of Knowledge is great for 11-19 as it provides strong waveclear, so your target is to get 3-4 of them until Level 17, do not mix them with other melee units, you want your ToKs to die first so your Range DPS can do its work on the remaining targets. Back to the top.
| Strength | Clears 6, 7 Strong 8, 9, 10 + Strong Midgame Clearing | |
| Weakness | Slow Pusher, 2, 3, Low Income on Fast Games | |
| Synergy | Bottom Feeder, Captain, Ice Troll, Alpha Male, Nightsaber | |
| Level | Value (if no send) | Aimed Lumber Ups |
| 1 | 290 | 1/0 |
| 2 | 290-420 | 1/0 - 3/0/td> |
| 3 | 420-515 | 2/0 - 4/0 |
| 4 | 420-515 | 2/0 - 4/1 |
| 5 | 670-895 | 2/0 - 6/1 |
| 6 | 670-895 | 5/1 - 7/2 |
| 7 | 750-895 | 7/2 - 7/3 |
| 8 | 900-1000 | 7/4 |
| 9 | 1000-1150 | 7/5 - 7/6 |
| 10 | 1300+ | 7/5 - 7/6 |
Aqua
Aqua Spirit commonly known as Aqua or Water is part of the God Tier of LegionTD Yolo Units, its waveclearing allows the player to go for hard lumberjack very early in the game. You should start with 4 Aquas Level 1, going 3/0, I see many people that go for only 3 Aquas, by this you are super vulnerable vs Level 1 send and will leak more than the wisp is worth. If there was no send yet, get 300 Value Level 2, you can't get this value if you went 4/0 already, so you're basically vulnerable for 2 Levels in a row. I recommend to get 400 Value Level 3 if your team is good here and 450 if they are not. Without send, 350 Value are pretty likely to hold, but care for the positioning, you should always build them shifted in 2 Rows, beginning from the wall. A video describing the importance of Positioning might be linked HERE as soon as it is finished. 400 Value easily hold Level 4, even 350 can hold but it's pretty risky. I prefer to slightly underbuild for Level 5 and 6 to get the most out of my lumberjack early on, this means going 550 for 5 and 600 for 6, take care of your farm if you only build small Aquas. Don't build for Level 7 if you could push instead. 7/4 is the minimum, if you have the opportunity to go 7/5, do it! Build all in for Level 8 again, you want to hold as much as possible, after this you can decide on whether you try to hold Level 9 with some Magic Damage or leak a few creeps to get more time. With already 7/5 you are not very likely to do decent damage to bosses so don't be sad if you leak all 3 here, clearing mass and wyverns is more than enough. Your arena value should be decent while having 7/5 and 7/6 and it is not uncommon to have the highest income in the game at this point. Aqua is pretty weak value in midgame so get some frontline for key levels and some backline to clear, Aquas are useful for 12 and ok fo 14. If enemy aims for a Level 18 send you can still up your Aquas. Back to the top.
| Strength | Solid Yolo Unit, providing high income | |
| Weakness | 7, 9, 10 | |
| Synergy | Polar Bear, ToT, Flying Machine, Other Auras | |
| Level | Value (if no send) | Aimed Lumber Ups |
| 1 | 200(150) | 3/0 |
| 2 | 300(250) | 3/0/td> |
| 3 | 400-450(350) | 3/0 - 4/0 |
| 4 | 400 | 5/1 - 5/2 |
| 5 | 550-600 | 5/1 - 6/2 |
| 6 | 600-650 | 6/3 - 7/3 |
| 7 | 700+ | 7/4 |
| 8 | 730-900 | 7/4 - 7/5 |
| 9 | 1000+ | 7/5 |
| 10 | 1300+ | 7/5 |
Harlot
Harlot is a pretty underrated unit that has the best holding qualities for Level 7, many people struggle though on how to play them. It's important to start as 1/0 and to note that 1 single Harlot does not hold Level 1, so you need to add a T1 or T2. Take care that you get 180 Gold on Level 2 to get a 2nd Harlot, this was the most important part of it already. If you expect a level 3 send you can add some more small units. Be sure to add a 3rd harlot for every following level, you need a 3rd one or massive adds for Level 4 since Harlot is not one-hitting this Level. They're also not one-hitting Level 5 so I recommend to get 4 Harlots here, if you want to go full holder, 7 harlots are the way to go but this will need some external feed by your team, you can still hold pretty confident with 6 Harlots and some small aura. In case of Immolation you should only get 5 Harlots so you hold your own lane atleast. Note that Harlots 2-hit Level 7 which is a huge advantage, but a Furb is making them 3-hit already which is a lot slower, still this is by far the fastest wave clearing on Level 7. If you're lucky with your aggro you might even have all Harlots surviving. Use the gold you got from holding to catch up with the lumberjack of your team. Many opponents cancel a Level 7 call after they see Harlots and go 8 instead, you are not a Level 8 holder, Harlots can even leak this Level with high Value. So that's basically their main weakness. If you got decent backline you can try to hold Level 10 aswell, for example Zeus or Ranger are great additions for your harlots. Your Income will be far from good at arena stage but you did your best to help saving heals on Level 7 and maybe blowing some of the enemy heals instead. Harlots are weak midgame value so try to get strong Range Damage for the key Levels awaiting you there. Back to the top.
| Strength | 3, 5, best holder for 7 | |
| Weakness | 1, 4, 8, Weak Midgame | |
| Synergy | Young Witch Doctor, Overseer, Bottom Feeder | |
| Level | Value (if no send) | Aimed Lumber Ups |
| 1 | 210-240 | 1/0 |
| 2 | 360-420 | 1/0/td> |
| 3 | 440-510(360) | 2/0 - 3/0 |
| 4 | 540-690 | 2/0 - 3/0 |
| 5 | 720-850 | 2/0 - 4/1 |
| 6 | 900+ | 3/0 - 5/1 |
| 7 | 1080+ | 3/0 - 5/1 |
| 8 | 1260+ | 5/2 - 7/2 |
| 9 | 1260+ | 7/3 - 7/5 |
| 10 | 1400-1750 | 7/3 - 7/5 |